 Tip-tip pilih tayar kereta yang baik...
Tayar adalah nyawa kedua anda selepas brek...Tayar adalah komponen yang paling penting bagi sesebuah kenderaan. Jika ia rosak, ia boleh menyebabkan kemalangan sekaligus mengancam nyawa pemandu dan penumpang tanpa diduga.. ikuti tip-tip yang diberikan kat bawah ni
1) PASTIKAN FAHAM CODE SIDEWALL TAYAR.
 Kenali kemampuan tayar kenderaan anda melalui maklumat dengan cara membaca yang tulisan pada tayar (sidewall)Penting sekali memilih tayar yang bersesuaian dengan keupayaan kereta. Jika kereta berenjin 1.3, cukuplah jika menggunakan rim sport bersaiz 14 inci (35 sentimeter). Jika anda menggunakan sport rim bersaiz 15 inci, kekuatan pecutan kereta akan menurun, speedometer tidak merekodkan bacaan yang tepat, memendekkan jangka hayat peralatan penyerap hentak dan meningkatkan penggunaan petrol.
cetakan 205/65 R16 95 V membawa maksud tayar itu mempunyai kelebaran 205 milimeter (mm), ketebalan tayar daripada rim ke permukaan jalan adalah 65 peratus dari kelebaran 205 mm dan untuk kegunaan rim berdiameter 16 inci. V bermaksud tayar sesuai untuk kelajuan sehingga 240 kilometer per jam (km/j) tanpa menjejaskan kekuatan dan ketahanan tayar. nombor 95 pula kapasiti tanggungan sebiji tayar.
2) PASTIKAN ANDA MEMBELEK TARIKH TAYAR DI KILANGKAN
 Mengikut piawaian tayar antarabangsa, tayar hanya boleh bertahan selama 2 tahun selepas di kilang (selepas tempoh itu getah tayar akan mati (keras) dan tidak selamat digunakan). Saya beri contoh nombor 0811 bermaksud tayar tersebut di kilang pada minggu ke 08 tahun 2011 ( 0811 = Bulan Feb, Tahun 2011 tayar tu dikilangkan) dan tarikh expired tayar tersebut jatuh pada 08 tahun 2013...Dalam satu tahun lebih kurang ade 48 minggu -kalau tayar itu tulis 52 minggu jangan beli..... Jadi sekiranya kita dapat ada kedai yang menjual tayar dengan harga yang luarbiasa murahnya, cuba periksa tarikh tayar tersebut , mungkin tayar tersebut adalah tayar yang telah tamat tempoh penggunaannya.Kegunaan tayar bergantung kepada tempoh hayat tayar dan millegae tayar. Walau pun bunga byk tapi klu dah guna lebih 2 tahun wajar ditukar sbb getah dah keras..
3) TAYAR BRAND (JENAMA) APA YANG PALING BAGUS???
 Tayar yang paling bagus boleh dinilai daripada harganya sebab tayar tu import made in Japan. Kata orang tayar mahal ni dikatakan lebih lembut. Memang benar, tayar seperti michelin, yokohama, falken lebih lembut kerana, tayar tersebut dibuat berdasarkan iklim sederhana yang kurang panas dan apabila digunakan di Malaysia yang cuaca panas terik, tayar tersebut akan mempunyai jangkahayat yang pendek (cepat habis bunganya)., jika untuk penggunaan biasa(bukan racing he..he.) tayar Dunlop, Silverstone dan Good Year sudah kira ok.Kalau boleh cuba elakkan Sime Tyre.. jika mahukan yang lebih baik boleh cuba Continental( sekarang satu kilang dengan Silverstone),Bridgestone,Toyo ataupun Michelin.. tapi harga dia mahal sikit la.. Orang kata tayar cap briston bagos - smooth driving, tak bising sangat. Cap micelin pon ok, ringan, jimat minyak tapi cepat haus.Tapi faktor bising senyap tahan atau haus bergantung kepada cara pemanduan dan jenis kereta Kebisingan tayar adalah bergantung kepada bunga tayar. Lebih senyap sesuatu tayar, maka lebih rapat bunga tayarnya dan tidak sesuai untuk permukaan jalan yang basah. Lebih bising tayar, lebih mencengkam dan sesuai pada permukaan yang basah. Jadi kalau kita hendakkan tayar yang senyap, kita terpaksa lebih berhati-hati semasa hujan
4) MARI KITA KENALI JENIS2 BUNGA TAYAR.
Tayar jenis Silverstone Powerblitz, Goodyear Eagle GA, dan Sime tyre Astar merupakan jenama tayar yang biasa digunakan oleh kenderaan kecil. Ia agak berpatutan dan bunganya kelihatan bersegi empat. Sesuai untuk pemandu biasa yang tidak memandu laju atau terlalu ekstrim. Jenis tayar ni keras juga membuatkan tayar ini boleh tahan agak lama.

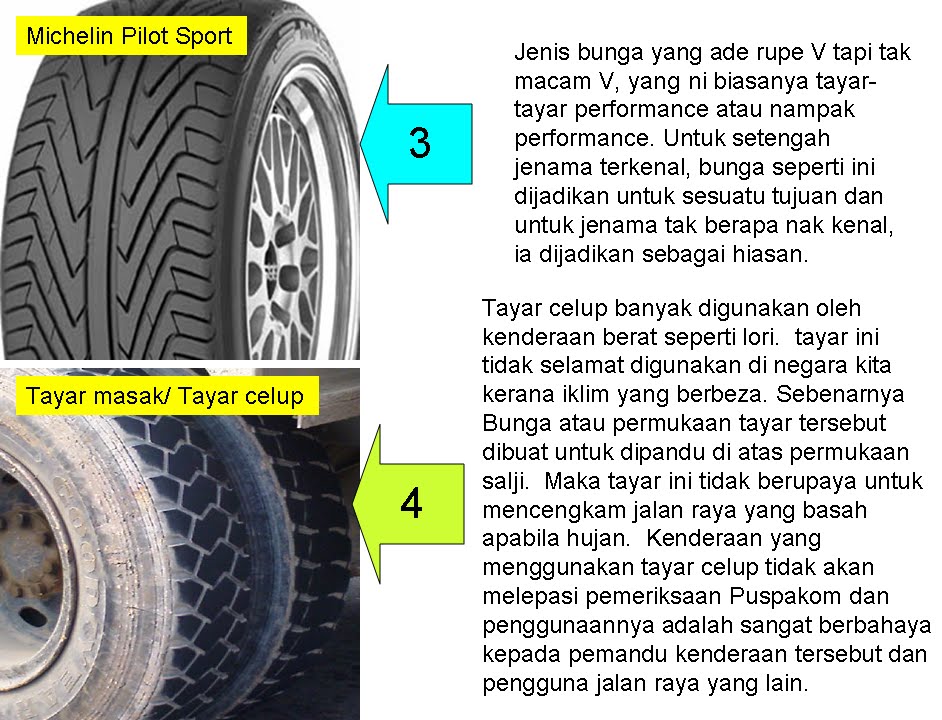
Tayar agak mahal harganya tapi tak boleh pandu laju ketika hujan adalah tayar jenis semi slick seperti Yokohama Advan Neova, Bridgestone Potenza G3, Falken Azenis, Pirelli P7, Michelin Pilot Sport, dan Toyo T1R. Dan jika tak kisah pasal keselesaan dan perlukan tayar yang mampu meneruskan perjalanan dengan lancar ketika hujan, tayar seperti Silverstone FTZ Evol 8, Goodyear Eagle F1, Kumho Escta 712 dan Yokohama Prada.
Dan jika anda memandu kereta sedan yang agak berat dan sering memandu jauh dan mementingkan keselesaan, tayar yang lebih baik adalah Bridgestone Turanza, Bridgestone My01, Bridgestone Potenza, Goodyear NCT3, Goodyear NCT5, Silverstone Kruizer 1, Michelin Pilot, Yokohama A-Drive, Michelin Energy, Yokohama C-drive dan Falken Ziex 326.
Harga tak dapat dipastikan, kerana saya sudah lama tidak terlibat dengan dunia tayar (jangan marah),kalau boleh cuba survey dulu 2,3 kedai, cuba tawar-tawar sikit harga, jika bernasib baik,tukar 4 tayar dia akan free alignment sekali..
5) BUAT ALIGNMENT DAN ROTATION & BALANCING TAYAR
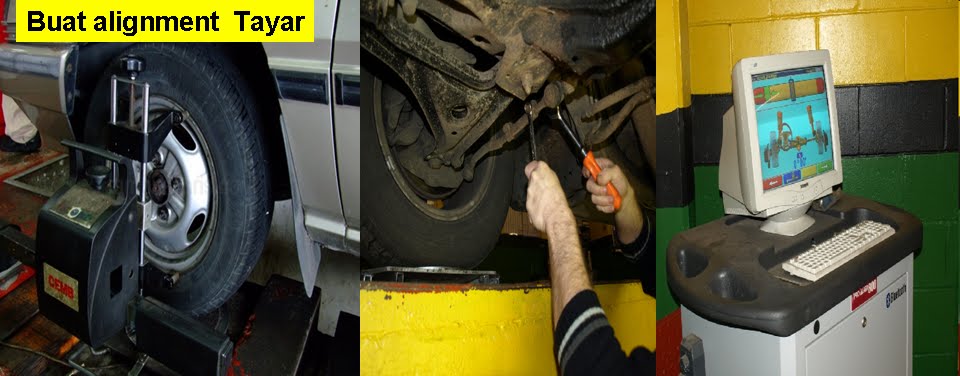

Selalu jaga aligmentnya setiap 3/6 bulan rotate tu tayar...nilah cara saya... Caranya, tayar depan kiri ditukarkan ke kanan belakang dan tayar depan kanan ditukarkan ke kiri belakang (untuk 4 tayar sama saiz). Lebih baik sekiranya tayar simpanan/ganti juga di masukkan ke dalam rotation tukaran tayar. Caranya, masukan tayar ganti ke kanan belakang, belakang kanan ke depan kanan, depan kanan ke belakang kiri, depan kiri ke dalam boot ganti, belakang kiri ke depan kiri. Semua rotation ini bergantung kepad jenis kereta, sistem pacuan dan sistem suspensi kereta. walaupun setiap 3bulan alignment dan balancing = memang mahal macam tak berbaloi,tapi fikirkan keselamatan anda. walaupun alignment lari sedikit saja, boleh jejaskan pengunaan petrol juga, kita membazir dan merosakkan alam sekitar kita dengan banyak tayar yang dibuang dan juga petrol. walaupun sebuah kereta jumlahnya sikit, tapi kalau 1juta kereta? sikit-sikit lama lama jadi bukit~ hehe
6) TAYAR BOTAK & TAYAR CEPAT HAUS??
 Tahap kehausan tayar boleh dilihat dengan mata kasar. Bunga tayar yang semakin licin menunjukkan penggunaan perjalanan yang tinggi. Begitupun, kehausan tayar boleh terjadi atas sebab-sebab lain seperti penyerap hentak yang rosak, penjajaran yang salah, permukaan jalan raya tidak elok dan corak pemanduan yang kasar.Kerap membrek secara kuat dan pemanduan yang agresif boleh menyebabkan tayar haus secara tidak sekata.
Tayar yang botak secara sekata pula adalah normal. Ia bergantung kepada jenis pacuan kenderaan. Kereta pacuan hadapan akan mengalami kehausan tayar hadapan dalam kadar lebih cepat. Dalam industri, tiada ketetapan yang khusus tentang kaedah rotasi tayar.
Ada yang mencadangkan perbatuan 10,000 kilometer (km), malah ada yang mencecah 20,000 kilometer. Rotasi tayar perlu dibuat dengan betul. Tayar hadapan kanan perlu ditukar dengan tayar belakang kiri dan begitulah sebaliknya.
Ada yang mencadangkan perbatuan 10,000 kilometer (km), malah ada yang mencecah 20,000 kilometer. Rotasi tayar perlu dibuat dengan betul. Tayar hadapan kanan perlu ditukar dengan tayar belakang kiri dan begitulah sebaliknya.


Jika kita perhatikan bunga tayar selepas beberapa lama. Bunga mula menghaus. Sekiranya kadar kehabisan bunga di bahagian tepi kiri kanan tayar lebih cepat berbanding di bahagian tengah, ini bermaksud selama tekanan tayar adalah kurang dari yang sepatutnya. Sekiranya bahagian tengah lebih cepat haus, maksudnya tekanan terlalu tinggi. Sekiranya haus di bahagian luar sahaja, tayar kita terlalu mencapah ke dalam dan jika haus bahgian dalam sahaja, tayar kita terlalu mancapah ke luar (alligment tayar perlu dibetulkan). Sekiranya bunga tayar yang haus tidak sekata (turun naik), maka absorber kita perlulah diganti.
7) BERAPA TEKANAN ANGIN TAYAR YANG SEPATUTNYA??

Jangan lupa periksa tekanan tayar sekurang-kurangnya dua kali sebulan. Tekanan tayar boleh dilihat pada pelekat yang lazimnya diletakkan di bahagian pintu pemandu sebagai rujukan. Jangan pam tayar lebih tinggi daripada had yang disyorkan. Jangan pula biarkan tekanan angin tayar berada di bawah paras yang dicadangkan. Sentiasa pastikan angin tayar betul. " Periksa sendiri Pressure setiap 2 minggu.. WAJIB.... kalau ada pressure gauge sendiri lebih baik.. (beli yg bentuk mcm pen tu murah jer..)presure tester menunjukkan sampai aras "3" tekanan angin tayar dikira mencukupi ,
Tekanan angin tayar untuk kerete 1.3 cc & 1.5 cc tekanan angin dalam lingkungan 190 kpa hingga 230 kpa ..contohnya kalau rim 15' tayar 55 siri. (Standard Gen.2 r waja)Tayar depan letak 210/3o.Tayar belakang 190/29. kalo kereta kancil rasanya around 180-200 kpa.Yang pasti kebanyakkan orang pump tayar kereta dengan tekanan 210 kpa
8) YANG SAMA BRAND ATAU SAMA MODEL SAHAJA....

Ramai org suka tukar tayar 2 bijik (biasa depan)... harus di ingat setiap jenis tayar di buat dgn charector nyer sendiri... dan corak bunganya pun tak sama.... So, kalau nak tukar pilih yg sama brand.. atau tukar semua..
9) FAKTA PENTING TAYAR YG DIGUNAKAN
1) Jangan gunakan tayar yang telah tamat tempoh. Semak catatan produksi tayar.
2) Jangan pakai tayar korek. Tahap kakisan tayar ini telah melebihi had rekaan pengeluar.
3) Jangan gunakan tayar berlainan model pada setiap sisi.
4) Pastikan ukuran tayar tidak melebihi had pengeluar.
5) Roda yang terlalu besar menyebabkan keupayaan berhenti menjadi rendah.
6) Rim yang rosak pada bahagian sisinya boleh menyebabkan kebocoran angin secara perlahan. Bukan disebabkan tayar terkena objek tajam.
7) Jangan memandu laju ketika hujan dengan tayar yang sudah haus. Ia boleh menyebabkan berlakunya aquaplaning, situasi apabila lapisan air di atas jalan raya lebih 'tebal' berbanding bunga tayar.Ia akan membuatkan tayar 'terapung', hilang cengkaman serta kenderaan tidak dapat dikawal oleh pemandu.


